平台差异化代码的使用场景 由于 KMM 运行在各平台时,实际上是翻译成了各平台专用的库,如:Android 上就会将共享模块编译成 Dalvik Bytecode 然后打包成 AAR 文件,而 iOS 上会打包成 Apple Framework,所以,一些平台相关的、不可共享的具体实现代码,就必须利用各平台的 API 来实现
举个简单的例子,公共模块有一个统一的业务逻辑——获取手机型号,控制逻辑可以在 KMM 的 common 代码库中实现,且它并不关系具体的实现逻辑,而实际需要获取手机型号字符串的方法,Android 需要调用 android.os.Build.MODEL 获取,而 iOS 需要通过 UIDevice.current.model 来获取
类似的平台强相关功能,就需要在 KMM 中利用平台差异化代码实现
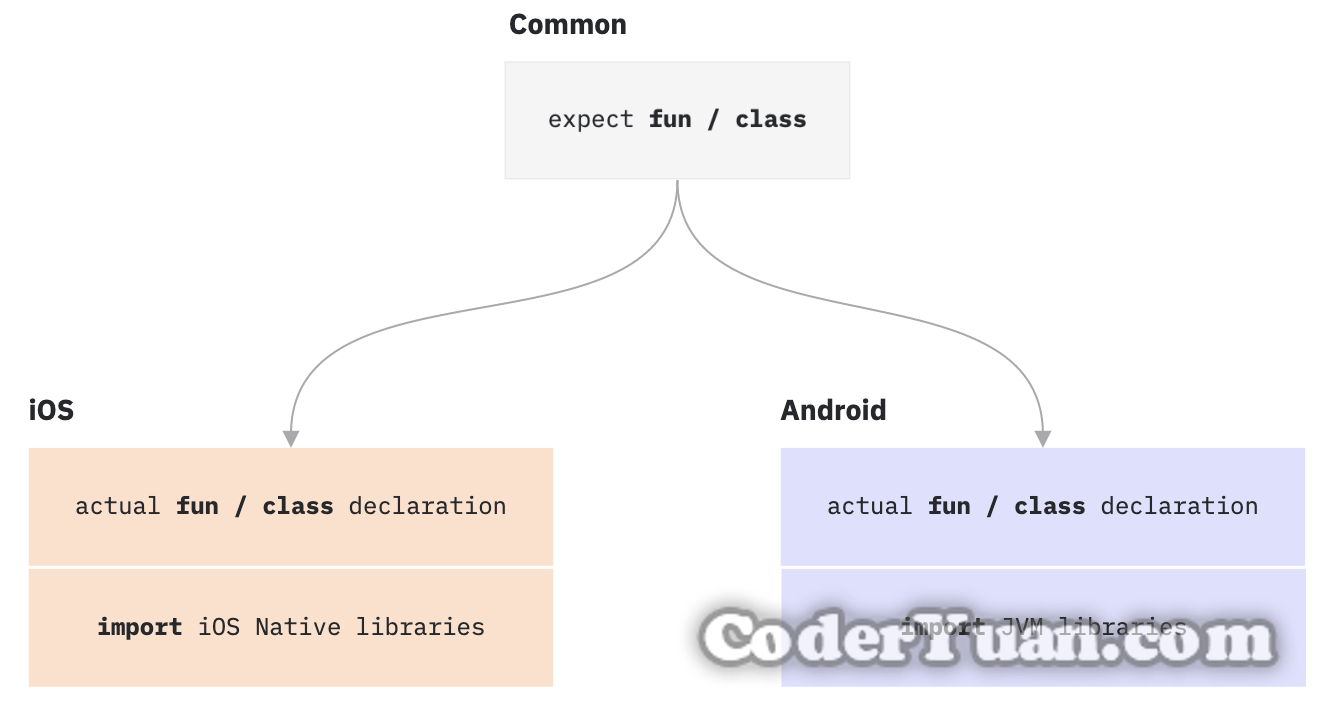
差异化代码的基本实现 这里需要再次引用 Kotlin 官方的一张图
如图所示,在 KMM 中,Common 库中可以将需要差异化实现的 class 或 fun 使用 expect 关键字修饰,expect 字面意思是:期望,这里代表需要各平台具体实现,之后在 Android、iOS 对应的库中,再使用 actual 关键字来创建对应的 class 及 fun ,即可完成差异化代码的构建,在 App 中调用 Common 中使用 expect 修饰的内容时,将自动执行不同平台的 actual 内容
Demo 及注意点 expect & actual 实现方式 这种方式是官方推荐的一种平台差异化功能实现方式,实际操作时也比较简单
在 Common 中建立一个 expect 类或 Top-Level 方法 如图所示,创建 expect 类或方法,有点类似 Kotlin 和 Java 中的 interface
在完成基本的代码以后,此时可以看到 IDE 已经报错了,提示没有找到给 Android 使用的 JVM 实现,以及给 iOS 使用的 Native 实现
完成 actual 实现 此时不要使用 Option + Enter(Windows:Alt + Enter) 来靠 IDE 自动创建, 需要分别在 androidMain 和 iosMain 目录中,创建与 expect 内容包名、类名、方法签名(包括方法名、参数类型及名称)完全一致的 actual 内容 ,否则会报错
Android 示例: 1 2 3 4 5 6 7 8 9 10 11 12 13 14 15 16 17 18 19 20 package com.coderyuan.myfirstkmmimport android.util.Logactual class PlatformSpecific { actual fun method1 () return "Android-Method1" } actual fun method2 () println("Android-Method2" ) } } actual fun platformTestFunc (v1: Int , v2: String ) Log.i("Android-Func" , "v1: $v1 , v2: $v2 " ) }
iOS 示例: 1 2 3 4 5 6 7 8 9 10 11 12 13 14 15 16 17 18 19 20 package com.coderyuan.myfirstkmmimport platform.Foundation.NSLogactual class PlatformSpecific { actual fun method1 () return "iOS-Method1" } actual fun method2 () println("iOS-Method2" ) } } actual fun platformTestFunc (v1: Int , v2: String ) NSLog("iOS-Func: v1: %d, v2: %s" , v1, v2) }
完成上面的双端功能实现以后,如果在 Android 或 iOS 主 App 中调用 Common 中的方法,将会执行各自实现的 actual 方法
注入式实现 除了官方的 expect & actual 实现模式,还可以使用类似 IoC 的注入式实现,我们可以利用 Interface 或 Block 的形式来让双端实现需要的差异化功能
如果使用过 Spring Framework 或 Dagger,此实现则不难理解
定义 首先,在 Common 中定义好需要注入的方法,可以使用接口或闭包,并使用单例来承载,如下代码所示:
1 2 3 4 5 6 7 8 9 10 11 12 13 14 15 16 17 18 19 20 21 22 23 24 25 26 27 package com.coderyuan.myfirstkmmimport kotlin.native.concurrent.ThreadLocal@ThreadLocal object PlatformSpecificMgr { var ifuncImpl: IFunc? = null var printLogBlockImpl: MyPrintLogBlock? = null } val sharedInstance = PlatformSpecificMgrinterface IFunc { fun printLogMethod (tag: String , content: String ) fun printLogMethod (tag: String , ts: Long , content: String ) } typealias MyPrintLogBlock = ((tag: String, type: Int , content: String) -> Unit )
注入实现 此时,我们需要在 Android 及 iOS App 主工程的代码中注入具体的实现
根据需要,选择合适的生命周期,也可以使用懒加载形式的注入,比如,在 Android App 的 Application 类中注入,在 iOS App 的 AppDelegate 类中注入
Android 示例: 1 2 3 4 5 6 7 8 9 10 11 12 13 14 15 16 17 18 19 20 21 22 23 24 25 26 27 package com.coderyuan.myfirstkmm.androidimport android.app.Applicationimport android.util.Logimport com.coderyuan.myfirstkmm.IFuncimport com.coderyuan.myfirstkmm.PlatformSpecificMgrclass MyApplication : Application () { override fun onCreate () super .onCreate() PlatformSpecificMgr.ifuncImpl = object : IFunc { override fun printLogMethod (tag: String , content: String ) Log.i(tag, content) } override fun printLogMethod (tag: String , ts: Long , content: String ) Log.i(tag, "time: ${ts} , $content " ) } } PlatformSpecificMgr.printLogBlockImpl = { tag: String, type: Int , content: String -> Log.i(tag, "type: ${type} , $content " ) } } }
iOS 示例: 1 2 3 4 5 6 7 8 9 10 11 12 13 14 15 16 17 18 19 20 21 22 23 24 25 26 27 28 29 30 31 32 33 34 35 36 37 38 39 import Foundationimport UIKitimport sharedimport os.logclass MyAppDelegate : NSObject , UIApplicationDelegate { func application (_ application : UIApplication , didFinishLaunchingWithOptions launchOptions : [UIApplication .LaunchOptionsKey : Any ]? = nil ) -> Bool { let mgr = PlatformSpecificMgr .init () mgr.ifuncImpl = LogImpl .init () mgr.printLogBlockImpl = { (tag: String , type: KotlinInt , content: String ) -> Void in let log = String (format: "%@: %@, type: %d" , tag, content, type.intValue) print (log) } return true } } class LogImpl : IFunc { func printLogMethod (tag : String , ts : Int64 , content : String ) { let log = String (format: "%@: %@, time: %l" , tag, content, ts) print (log) } func printLogMethod (tag : String , content : String ) { let log = String (format: "%@: %@" , tag, content) print (log) } }
那么,在使用时,可以按照如下的代码进行调用
1 2 3 4 5 6 7 8 9 10 PlatformSpecificMgr?.ifuncImpl?.printLogMethod("MyLog" , "test" ) PlatformSpecificMgr?.ifuncImpl?.printLogMethod("MyLog" , 1234567890 ,"test" ) PlatformSpecificMgr?.printLogBlockImpl?.invoke("LogBlock" , 1 , "testBlock" )
iOS 调用示例:
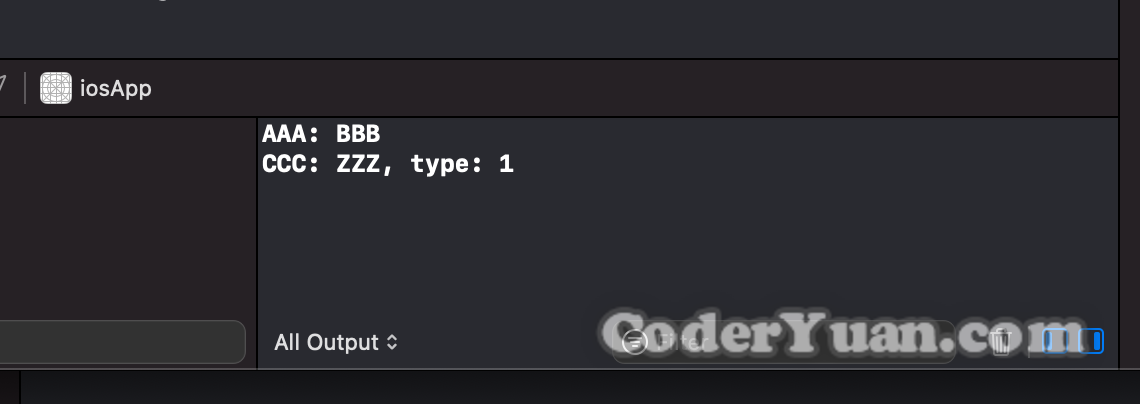
1 2 3 4 5 PlatformSpecificMgrKt .sharedInstance.ifuncImpl? .printLogMethod(tag: "AAA" , content: "BBB" )PlatformSpecificMgrKt .sharedInstance.printLogBlockImpl? ("CCC" , 1 , "ZZZ" )
在 iOS 模拟器中运行一下,可以看到打出的 Log